Have you ever wondered how your computer knows where to find a website when you type in an address like “facebook.com”? I sure did when I first started building websites! Behind every website name is something called DNS, think of it as the internet’s address book. When I was setting up my first website cybertechguide.com, figuring out how to find the DNS name (or nameservers) for my domain felt like trying to decipher a secret code.
If you’re puzzled by DNS like I was, don’t worry, you’re not alone. Whether you’re trying to move your website to a new hosting company, fix connection problems, or just curious about how the web works, knowing how to look up DNS information is incredibly useful.
In this guide, I’ll share four simple methods I’ve used countless times to find DNS names. I remember how overwhelming technical terms felt when I started, so I’ve broken everything down into plain English. By the time you finish reading, you’ll be checking DNS names with confidence, no computer science degree required😅!
Method 1: How to find the DNS using Online DNS Lookup Tools
When I first needed to look up DNS information, I was relieved to discover online tools that make the process incredibly straightforward. No downloading special software or typing complex commands!
Let me walk you through my favorite method, which I use almost daily:
Step 1: Choose an Online DNS Lookup Tool
I usually start by visiting a website called DNSChecker.org (though MXToolbox.com and WhatsMyDNS.net work great too). The interface is clean and simple exactly what you want when you’re trying to get information quickly.
Step 2: Enter the Domain Name
Once there, I type the website address I’m curious about into the search box. For example, when I was helping my friend troubleshoot her online store, we entered “shopify.com” to see how their DNS was set up.
Step 3: Select the Right DNS Record Type
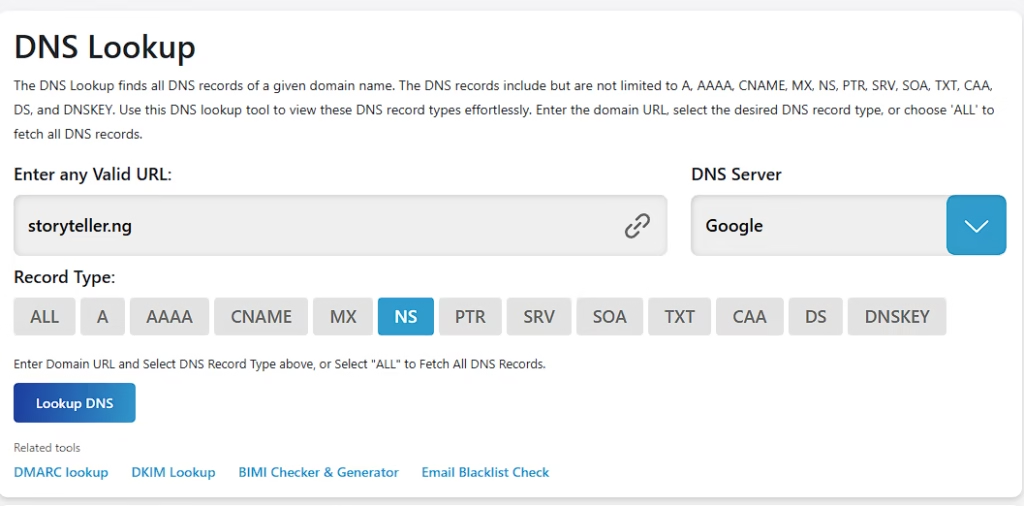
Most of these tools have a dropdown menu where you’ll want to select “NS” or “Nameserver” that’s what tells the tool you’re specifically looking for DNS information.
Step 4: Run the Search and Review Results
After clicking the search button, the results appeared within seconds. I still remember how satisfying it was the first time I used one of these tools and actually understood what I was looking at! You’ll see entries that look something like “ns1.example.com” and “ns2.example.com” these are the DNS nameservers for that domain.
What I love about this method is that it works whether I’m on my laptop, tablet, or even my phone. No special knowledge required just type, click, and you’ve got your answer. It’s my go-to recommendation whenever friends ask for help with their websites because it’s virtually foolproof.
Method 2: How to Check Your DNS Through Your Domain Registrar
If you own the domain you’re checking, there’s an even easier way to find its DNS information. This is actually the method I use most often for my own websites, and it’s super straightforward.
Step 1: Log in to Your Domain Registrar
First, you’ll need to sign in to your account at whatever company you purchased your domain from. This might be Hostinger, GoDaddy, Namecheap, Bluehost, or any other domain registrar. I remember being confused about this when I started your domain registrar is simply the company you pay yearly to own your domain name.
Step 2: Navigate to Domain Management
Once logged in, look for sections labeled “My Domains,” “Domain Manager,” or something similar. The exact wording varies between companies, but they all have a section where you can manage your domain properties. When I first did this with my blog domain, I spent a few minutes clicking around before finding the right page!
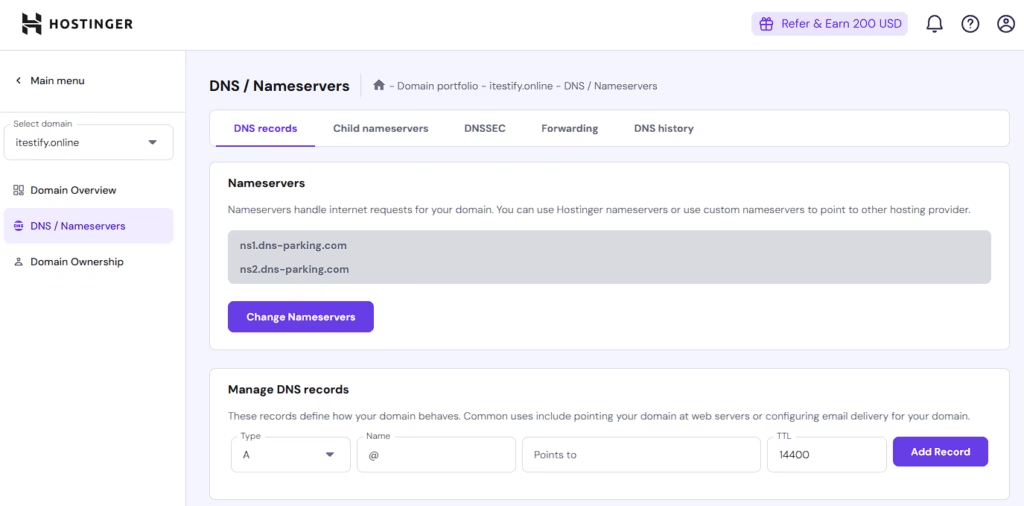
Step 3: Find the DNS or Nameserver Section
Within your domain’s management page, look for tabs or sections labeled “DNS Settings,” “Nameservers,” or “DNS Management.” At Namecheap (where I have most of my domains), it’s under a tab called “Domain” with a “Nameservers” section right there on the main page.
Step 4: Review Your Current DNS Settings
Once you find the right section, you’ll see your current nameservers listed. They typically look something like “ns1.example.com” and “ns2.example.com” (there are usually at least two). I remember feeling a small victory the first time I successfully found this information for my food blog!
What I particularly like about this method is that not only can you see your DNS settings, but you can also change them if needed. When I switched hosting providers last year, I simply updated these nameserver entries, and within hours my website was pointing to the new host.
This method is perfect if you own the domain and have your login information handy. It’s my preferred approach whenever I’m setting up a new website or making changes to an existing one.
Method 3: How to Check Your DNS Using Command Prompt (Windows)
I’ll admit, when I first heard about using Command Prompt, I was intimidated. It looked like something only hackers in movies would use! But once I tried it, I realized it’s actually quite straightforward and gives you detailed information about any domain’s DNS.
Step 1: Open Command Prompt
The easiest way to open Command Prompt is to press the Windows key + R on your keyboard (that’s the key with the Windows logo and the letter R). This opens a small “Run” box in the corner of your screen. Type “cmd” and hit Enter. A black window with white text will appear, that’s Command Prompt!
Step 2: Type the DNS Lookup Command
Now for the fun part! In the Command Prompt window, type the following command (replacing “example.com” with whatever domain you want to check):
nslookup -type=ns example.comI still remember the first time I did this for my friend’s photography website. I felt like a real tech expert, even though I was just copying a command I had just learned!
Step 3: Press Enter and Analyze the Results
After hitting Enter, you’ll see several lines of text appear. Don’t worry if some of it looks confusing you only need to focus on the section labeled “Non-authoritative answer.” Under that heading, you’ll see the nameservers listed for the domain.
For example, when I check google.com, I see several entries that look like “ns1.google.com,” “ns2.google.com,” and so on. These are Google’s DNS nameservers.
Step 4: Write Down or Screenshot the Results
I usually take a screenshot of these results so I have the information saved. This has been incredibly helpful when I’ve needed to contact technical support or when configuring new websites.
What surprised me about using Command Prompt was how quickly it returns results, usually faster than the online tools! And since it’s built right into Windows, you don’t need an internet connection to use it if you’re troubleshooting network issues.
Don’t let the technical appearance fool you, this method is actually quite beginner-friendly once you get past the initial unfamiliarity. I now use it regularly, especially when I want to check multiple domains quickly without opening a browser.
Method 4: How to Know Your DNS Using Terminal (Mac or Linux)
When I switched to a Mac a few years ago, I had to learn a slightly different approach to finding DNS information. If you’re using a Mac or Linux computer, Terminal is your friend for this task. I was pleasantly surprised to find it’s just as easy as the Windows method, just with a different command.
Step 1: Open Terminal
On a Mac, you can find Terminal in your Applications folder, inside a subfolder called “Utilities.” An even quicker way is to press Command + Space to open Spotlight search, then type “Terminal” and hit Enter. Linux users will have Terminal in their applications menu as well.
Step 2: Enter the Dig Command
Once Terminal is open, you’ll see a window that looks similar to Windows Command Prompt, a plain background with text. Here, you’ll type the following command (replacing “example.com” with the domain you want to check):
dig example.com NSThe first time I used this command was when setting up my design portfolio site. I remember thinking how elegant the command is, just “dig” followed by the domain and “NS” for nameserver records.
Step 3: Review the Results
After pressing Enter, you’ll see several sections of text appear. Look for the part labeled “ANSWER SECTION” this is where the DNS nameserver information is displayed. Each line in this section that ends with “NS” shows one of the domain’s nameservers.
For instance, when I checked my favorite news site, I saw entries like “skynews.com. 172800 IN NS ns1.example.com.” The important part is what comes after the “NS” that’s the nameserver address.
Step 4: Use Additional Options for More Details
What I grew to love about the dig command is how flexible it is. If you want more detailed information, you can add flags to the command. For example:
dig +short example.com NSThis gives you just the nameserver information without all the extra details; perfect when you’re in a hurry!
I’ve found the Terminal method incredibly useful on my MacBook, especially when I’m working remotely. Like the Windows Command Prompt method, it works even if your internet connection is spotty, since it uses your system’s built-in DNS resolution capabilities.
If you’re new to Terminal, don’t worry about memorizing the commands, I kept a sticky note on my desk with these commands until they became second nature. Now they’re part of my regular toolkit for website management.
FAQs on DNS Lookups
What exactly is a DNS nameserver?
Why would I need to find DNS nameservers?
How many DNS nameservers should a domain have?
Are DNS nameservers the same as web hosting?
How long does it take for DNS changes to work?
Wrapping up
When I first started working with websites, DNS felt like this mysterious force controlling the internet from behind the scenes. After learning these four methods and using them regularly, I now see DNS lookups as just another handy tool in my digital toolkit.
Whether you prefer the simplicity of online tools, the convenience of checking through your domain registrar, or the technical approach of command-line methods, you now have multiple ways to find DNS information for any domain.
I’ve found that being comfortable with DNS lookups has saved me countless hours of frustration when setting up websites, troubleshooting connection issues, or simply helping friends with their online businesses. It’s one of those skills that seems small but makes a huge difference.
What has your experience been with DNS? Have you tried any of these methods, or do you have another approach that works well for you? I’d love to hear about it in the comments below!
And if you’ve found this guide helpful, I invite you to join my “Insiders Advantage” newsletter. Each week, I share easy-to-follow tech tips, website management strategies, and exclusive tutorials that make the technical side of the internet accessible to everyone. No jargon, no complexity – just clear explanations like this one.
Just enter your email below to join our community of fellow website owners who are learning the ropes together. As a bonus, subscribers get access to my DNS troubleshooting checklist; a resource I wish I’d had when I started!
Thanks for reading, and happy DNS hunting!
Disclosure: My content is reader-supported. If you click certain links, I may earn a commission at no extra cost to you. Your support helps keep my blog running. Learn more about my funding and editorial process.